Your cart is currently empty!
Daenerys Game of Thrones season 7 White Coat
January 14, 2018
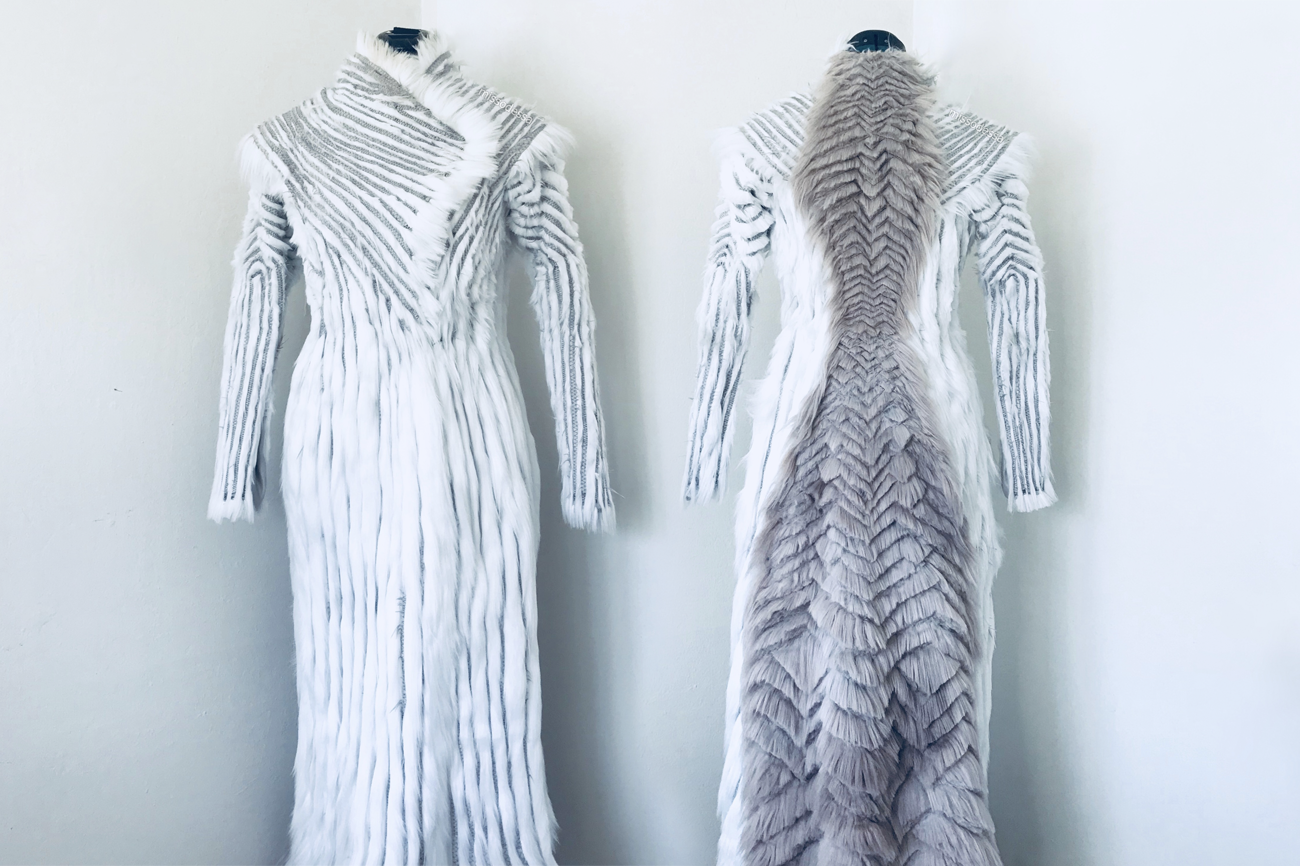
So as soon as I saw Daenerys winter coat in season 7 of Game of Thrones I just new I had to make it. Michele Clapton was the costume designer and her work is phenomenal! I have never worked with fur and this is actually the first full length jacket I have ever made. I knew I was crazy for attempting this but I’m that determined and I’m that crazy that I did. I spent a week working on this jacket and I mean almost every day from the time I got up until the middle of the night, until damn near dawn. I was exhausted, my fingers were sore and my entire place was covered in fur, by the way it is 100% fake fur. When I completed the jacket I vacuumed my place everyday for a week and there was still traces of fur. The coat is so bad ass and it was worth all the blood sweat and tears. I literally had nose bleeds from fur getting into my nose!
Regrettably during the process I didn’t take too many process photos, this first jacket was such a learning experience for me and there are so many things I would do differently. I’m hoping to make another one soon with some improvements but for now the few of you that may want to attempt this on your own I’ll offer some tips and ways to approach.
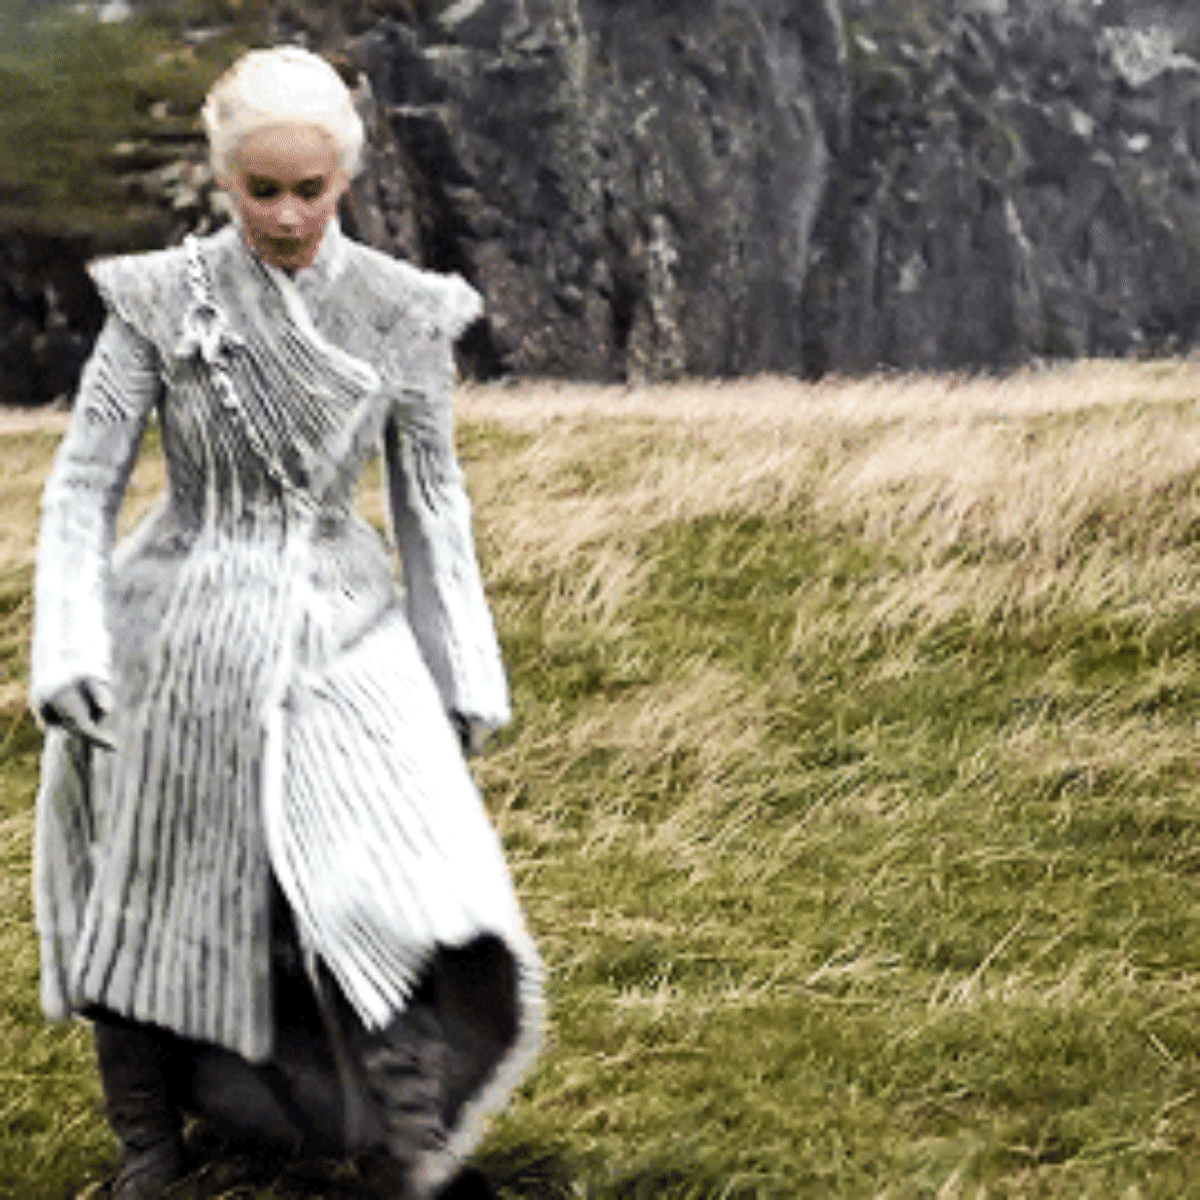 I used a lot of reference images from here and here
The Pattern: At the time I couldn’t find a pattern but lucky for you you can use this free template by another daenery’s cosplayer. It has a similar cut you can alter the front part of the pattern. (free pattern here) There’s even good process photos of her pieces on the mannequin pretty similar to how my process was. I bought some cheap felt from Joann’s and used an old trench coat as a basic guideline to build a sleeveless coat. After I had a basic felt coat I basted (loosely stitched) it together and put it on my mannequin to fit. The front pieces of the coat actually wrap around over the shoulders and end diagonally on the back. (see here) So I ended up drawing with a fabric marker where those pieces would end and be cut from the back, then cut them. So basically just the front pieces of the coat were now on my mannequin. I added winged shoulders by pinning extra fabric then cutting it into shape and I did the same with the collar. I then used those pieces as patterns and recut them as one full piece again so that I wouldn’t have to worry about pins and pieces coming part. I slowly pinned the rest of the coat together and cut it into shape. It’s really all about fitting each section to your body form and shaping it. I cleaned up the rest of my final pattern pieces by recutting them in felt. I ended up with 6 pieces not including the sleeves, 2 front panels, 2 sides and 2 back pieces. I did the sleeves last.I also had to cut the detailed back piece separately thats actually sewed on top of the back of the coat.
I basted all my final pattern pieces together and once the felt jacket looked good on my mannequin I took it part and used those pieces as the pattern to cut out the actual fur material.
The Fur Prep: I recommend for the white parts of the coat using a 1inch pile of fur, my first screw up was getting fur that was too long which made me work harder. For the back piece get a long 2-3inch pile of husky or shaggy fur (I got mine from joanns). I also dyed my back piece using a bottle of rit synthetic dye in the color chocolate. No matter how long I left it in it only got as dark as it is in pictures but the backing was dark brown. All fabrics dont take to dye the same so better to test on a scrap piece first and Maybe if you’re lucky you can find tan fur that’s long enough for the back. After it was dyed I blow dried and brushed it straight.
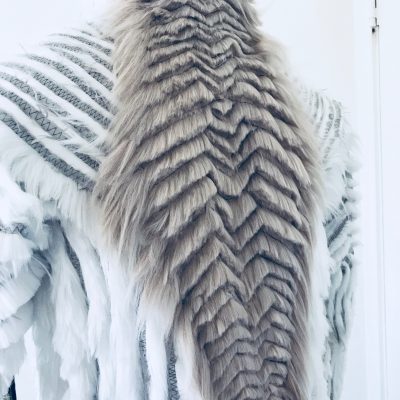 The Dragon Scale Back Piece: I cut the back piece into two parts so it was easier to work with. I took a fabric marker and drew the pattern on the back side of the fabric, brushed the fabric down in one direction and sewed each line with a visibly darker thread. Once I sewed all the lines I took scissors and cut right next to the seams as close as i could get. make sure your scissors are sharp and hair scissors work best. This part is very time consuming but you want to take your time because its one of the main features of the jacket.
I did try using mens clippers to free hand cut the line on a test piece of undyed fur but it ended up being way messier and much harder to keep track of the lines. The method I ended up using is more time consuming but it was worth it in the long run. Make sure to wear a mask or bandana over your face when cutting fur and keep a vacuum on hand, it gets messy fast!
Jacket Construction: I had all the fur pieces pinned to the mannequin to double check the fit then I worked on the coat in sections starting with the front pieces first. I drew the pattern on the back sides, sewed in the lines just as I did with the back piece only when I was done I pinned the pieces onto the mannequin. Then I cut strips of faux suede fabric (a bit under 1/4″). Another mistake I made was making sure the fabric didn’t fray…it was hard to work with so I suggest getting something that doesn’t fray. Once I had them cut I began to pin them to one of the front piece, a few at a time. Then removed the piece from the mannequin and zig zag stitched them on and repeated. If you’re using a shorter pile of fur you might be able to skip some steps, pin the jacket on the mannequin, pin the strips on and go straight into zig zag stitching them on.
It took me days to do this and was not only time consuming but very frustrating work. Once I had the front pieces finished I attached the 2 side pieces and use the same method to continue adding strips. I did the same thing to both back pieces but separately then when I was completed I attached everything together. I was able to use my machine for most of this but the back dragon scale piece had to be sewn on by hand.
The Sleeves: The sleeves were done last and I combined both methods. Drew the pattern on the back side, sewed in the lines from the back side, sewed on the suede strips and then cut the fur on the top part of the sleeves. The lines going straight down should not be blunt at all. To attach the sleeves I sewed them on by hand. I also lined the inside of the jacket with a grey satin and put a inside pocket in the front panel a bit under the waist line so that I was able to get to it easily. I had to add an invisible button to the top and to the waist to keep it closed.
All in all it was a challenge to complete but a really great learning experience. I’m glad I dove in head first and now I know a lot about working with fur and making amazingly complex outerwear. Peep some of my process photos below.


Erica Kopka
July 20, 2022 10:37 amDo you have pattern pieces?
Missodessa
July 21, 2022 4:20 pmUnfortunately I do no have a pattern for this thats digitized. If you search pinterest there are a couple patterns for the coat there.